How to Create Free Ringtones for an iPhone
Matt Cone January 2, 2013 Tutorials iPhone
The iPhone and Mac make many tasks easy, but creating ringtones is not one of them. You’d think it would be a simple matter to create your own custom ringtones, but it’s not. In fact, many people aren’t even aware that they can create free custom ringtones for their iPhones! We’re here to guide you through the process.
This tutorial will show you two ways to use your Mac to create free ringtones for your iPhone: Creating a ringtone from a YouTube video, and creating a ringtone from a song in your iTunes Library. Let’s get started!
Extracting Audio From a YouTube Video
If you decide to create a ringtone from a YouTube video, the first step is downloading the audio from a video on YouTube. (You can skip this section if you’d rather create a ringtone from a song in your iTunes Library.) We can do that by using a free website that extracts the audio from a YouTube video and then provides it as a downloadable MP3 file.
Here’s how to find and download audio from YouTube:
Visit YouTube and find a video that you want to turn in to a ringtone. Note that the ringtone can’t be longer than 30 seconds, so you’ll need to select a snippet of the audio if the video is longer than that. You’ll learn how to do that later.
Copy the URL of the YouTube page, as shown below.
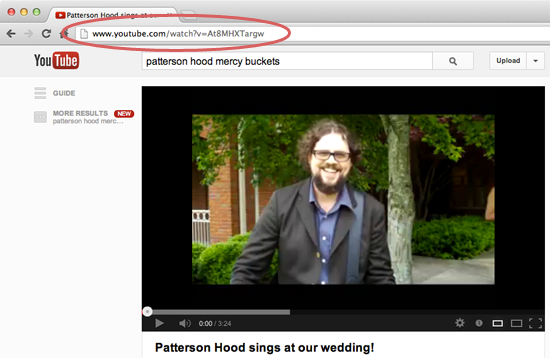
Visit ListenToYouTube.com, paste the URL in to the Enter YouTube URL field, and then click Go.
Wait a couple of minutes for the website to extract the audio. When the audio is ready to download, click Click here to get your Download Link, and then click the Download MP3 button.
The MP3 file downloads to your Mac. Make a note of the file’s location on your Mac — you’ll need the MP3 file in just a minute!
Importing the Audio to GarageBand
Whether you’ve just extracted audio from a YouTube video, or you plan on using one of your songs in iTunes, the next step is importing it to an application called GarageBand. It’s a big application capable of creating, capturing, and editing audio snippets. It’s easy to get overwhelmed in GarageBand when you first start using it. Just follow our instructions and you’ll be fine. Here’s how to create the ringtone with GarageBand:
Download and install GarageBand from the Mac App Store if it’s not already installed on your Mac.
Open the GarageBand application. The window shown below appears.
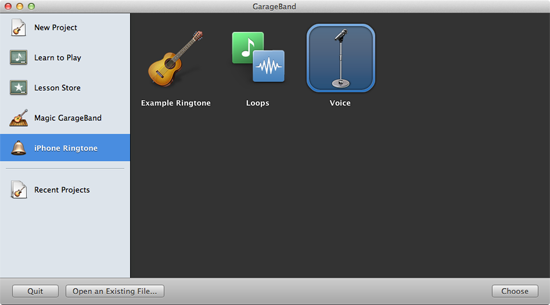
From the sidebar, select iPhone Ringtone, then select Voice, and then click Choose. The window shown below appears.
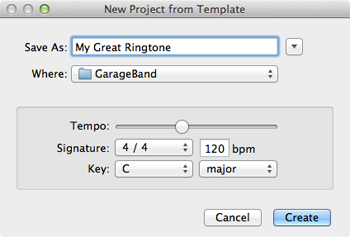
Enter a name for your ringtone, and then click Create. The window shown below appears.
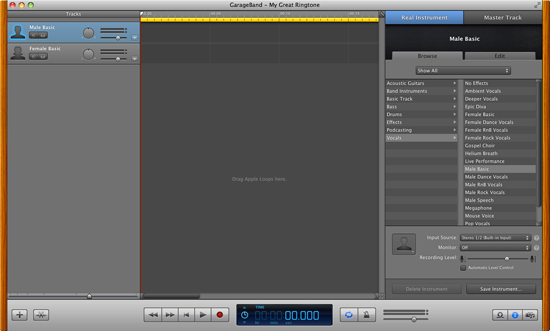
If you extracted audio from a YouTube video earlier, drag and drop the MP3 file on to the GarageBand window. You’ll notice that the audio appears in one of tracks, as shown below. (Don’t worry about the other empty tracks — you can ignore those.)

At this point, you can skip to the next section if you extracted the audio from a YouTube video. The people who want to use a song in their iTunes Library still need to import their song to GarageBand. We’ll do that now.
In the lower-right corner of the GarageBand window, click the Media Browser button, as shown below.

The songs in your iTunes Library appear in the GarageBand window, as shown below. (Actually, everything from iTunes appears — you can select a movie or video stored in iTunes, too.)
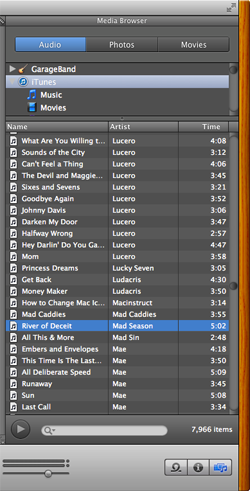
Drag and drop the song you want to use on to the center pane in the GarageBand window. You’ll notice that the audio appears in one of tracks, as shown below.
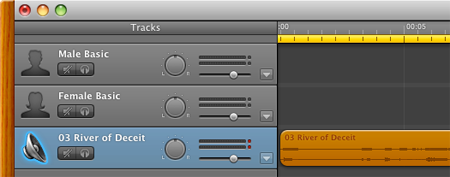
Congratulations! You’ve successfully imported audio in to the GarageBand application. Now we need to select an audio snippet and export it as a ringtone.
Selecting the Right Audio Segment
Now that you’ve imported the audio to GarageBand, you need to choose the selection that will be used as the ringtone. Remember, you only get 30 seconds (or less, if you want to record a shorter segment), so it’s important to select the part you want to use.
Take a look at the center pane of the GarageBand window, as shown below. See that yellow bar at the top of the pane? That’s the section of the audio that will be used as the ringtone.

You can move the yellow bar to a different part of the track by clicking and dragging it. You can also resize the bar to capture a longer or shorter section of the audio — do this by dragging the end of it. Just don’t make it longer than 30 seconds!
Previewing the Ringtone
To make sure you’ve selected the right audio segment, you should preview it before you export it to iTunes as a ringtone. Fortunately, the tools you need to preview the ringtone are built right into GarageBand. Just click the play button at the bottom of the GarageBand window, as shown below.

The ringtone starts playing and repeats when it gets to the end. If you realize that you selected the wrong audio segment, simply drag the bar and/or resize it as described in the previous section. Once you’re satisfied that you’ve selected the right audio segment, you can continue on to the next section.
Exporting the Ringtone to iTunes
Alright! You have a audio segment that you’re ready to use as a ringtone. The next step is getting the ringtone in to iTunes, at which point we’ll be able to transfer it to our iPhone. All you have to do is select Send Ringtone to iTunes from the Share menu. The ringtone is now stored in iTunes!
Transferring the Ringtone to the iPhone
You’re almost finished. Now all you have to do is transfer the ringtone from iTunes to your iPhone. Here’s how to do it:
Connect the iPhone to your Mac.
Open the iTunes application.
To verify that the ringtone was transferred to iTunes, select Tones from the Library menu, as shown below.
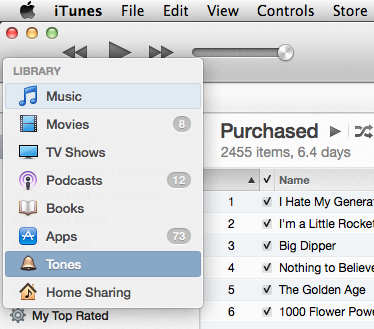
Your new ringtone show be displayed in the list, as shown below.

So we know now that the ringtone is stored in iTunes. Now we need to make sure that the ringtones are syncing with the iPhone. To check, click the iPhone button in the top-right corner, as shown below.
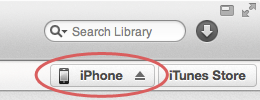
Click Tones. The window shown below appears.
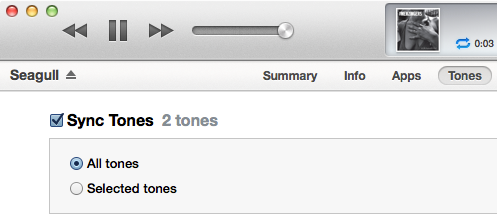
Select the Sync Tones checkbox, and then select All Tones.
Click the Apply button in the lower-right corner. The iPhone will sync with the Mac, and the ringtone will be transferred to the iPhone.
Nice work! You’ve successfully transferred your new ringtone to the iPhone.
Setting Your iPhone to Use the New Ringtone
Congratulations! You’ve made it to the last step: Setting your iPhone to use your new ringtone. Here’s how to do it:
From the home screen, tap Settings. The screen shown below appears.
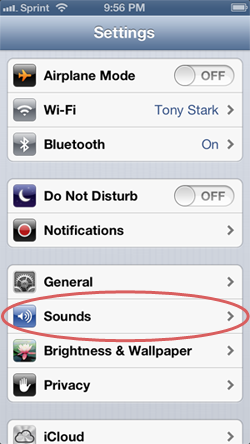
Tap Sounds. The screen shown below appears.
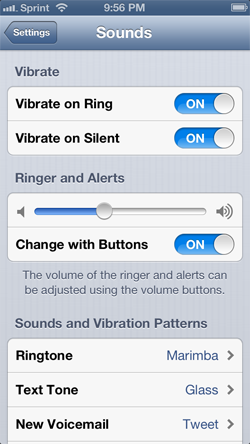
Tap the action that you want to play your new ringtone. For example, if you want to use the ringtone for incoming calls, tap Ringtone. Or if you want it to play when you receive a new email message, tap New Mail. Once you select an action, the screen shown below appears.
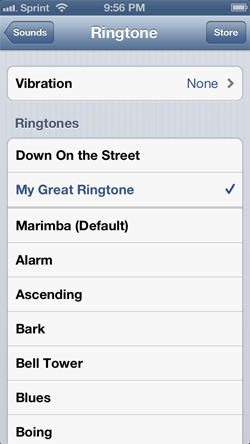
Tap your new ringtone to select it.
Congratulations! You’ve just created a ringtone and set it as a sound on your iPhone. To make more ringtones, simply follow these instructions again and set the ringtones as sounds on your iPhone. As long as you already own GarageBand, the process is free and you can make as many ringtones as you like.
Subscribe to our email newsletter
Sign up and get Macinstruct's tutorials delivered to your inbox. No spam, promise!