How to Restore from a SuperDuper! Backup
Matt Cone December 15, 2011 Tutorials Mac Apps Backups
You made backups with a third-party application called SuperDuper! Now maybe the time has come to transfer your backup onto another hard drive. Maybe the unthinkable happened and your primary hard drive failed. Or maybe you just replaced your primary hard drive with a new, larger drive. Whatever the case, you need restore from your SuperDuper! backup.
Tip: If you haven’t yet used SuperDuper! to back up your hard drive, learn how by reading Back Up (Clone) Your Mac’s Hard Drive with SuperDuper!
Here’s how to restore from a SuperDuper! backup:
- Connect the backup drive to the computer, if it is not already connected. (If your primary hard drive has failed, you can boot from your SuperDuper! backup drive by using it as the startup disk. For instructions, see How to Change Your Mac’s Startup Disk.)
Warning: You can’t restore the backup to the current startup disk.
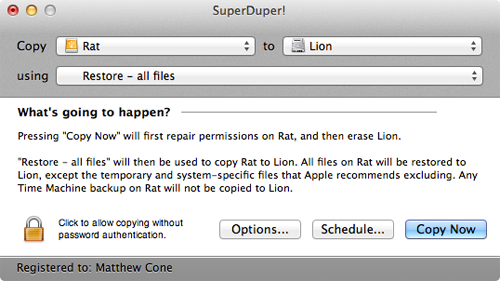
- Open the SuperDuper! application. The window shown below appears.

- Select the backup disk from the Copy menu.
- From the To menu, select the hard disk you want to restore the backup to.
- From the Using menu, select Restore - all files.
- Click Copy Now. SuperDuper! starts restoring your backup to the selected hard drive. Depending on the size of your hard drive, this can take a couple of hours. You can continue using your computer while SuperDuper! is restoring the hard drive.
Related Articles
- Back Up (Clone) Your Mac’s Hard Drive with SuperDuper!
- How to Update a SuperDuper! Backup
- How to Schedule SuperDuper! Backups
- How to Test Your SuperDuper! Backup
Subscribe to our email newsletter
Sign up and get Macinstruct's tutorials delivered to your inbox. No spam, promise!